Wood For Making Furniture

Wood For Making Furniture

Every project starts roughly the same.   You need something and think to yourself, I can make that.  You sit down, pencil in hand, and sketch your ideas.  With the rough idea in hand, you make a quick cut list to figure out just how much, and what kinds of materials you’ll need.  The next step is to then take a moment to get over the shock of how much the material is going to cost.   Undeterred you decide to push on, but you’ve got some decisions to make.  In this article, we’ll go over some of my thoughts on materials and the many things to consider before you begin that next masterpiece.


Choosing the right materials for any project is the first and arguably the most important step in a successful project.   If you make good decisions and choose wisely, not only will the outcome of your next project be improved, but the overall experience will be much more enjoyable.   Things such as durability, strength, aesthetics, color, workability, cost, stability, and availability, are all things to keep in mind when choosing the right material for each specific project.  By carefully considering all these factors, you can make an informed decision and by the time you’ve completed your project, you’ll have a piece that will stand up to the test of time.


So, you have a design, you have a cut list, and you have a vision.  Where to start?  Take a moment to consider what it is you are building and your desired outcome.  Pieces of fine furniture will require a large investment of both time and money.  Using the finest materials is likely to be the best approach.  On the other hand, you’re not likely to use furniture grade on that new chicken coop.   Sometimes cheap lumber from the big box store and quick and easy joinery is the way to go.


Ok, first things first.

Wood movement, yes, it’s real, and it can cause havoc.  If you’re designing your pieces of furniture, make sure to allow for this, and never underestimate the amount of movement and the destructive nature it can have if not allowed to move freely.  I mention this because it will play a large role in the woods you choose for a particular project.  Take some time and learn about wood movement and how it differs, sometimes extremely, from species to species.   Years ago in college, we were introduced to the book “Understand Wood – A craftsman’s guide to wood technology” by Bruce Hoadley.  Although printed over 40 years ago it remains a book, I’d recommend looking at.


Of course, there’s endless information available online and time spent educating yourself in this area will pay dividends later when your choosing appropriate woods for specific designs.  You’ll also have a good understanding of why certain craftsmen choose specific woods for their designs and why some pieces of furniture fail while others seem to last forever.


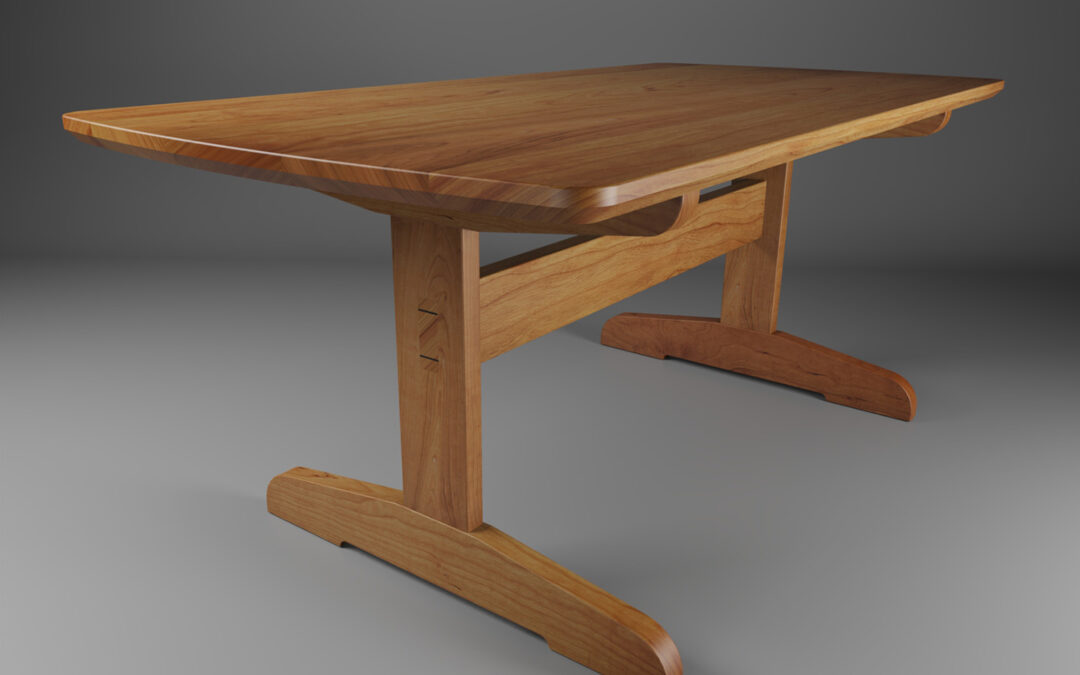
For this article let’s assume we’re going to make the Branch Butchers Trestle Table.  After taking some time to familiarize yourself with the design, consider your budget, and think about the desired outcome you decide you’re all in, and you’re going to use some high-grade materials.  Before you go head out to the local lumber supplier and load up your vehicle and empty your wallet let’s consider what species would be best.  Your new table will have different requirements than a coffee table or a bookshelf. A dining table needs to be sturdy and durable enough to withstand the daily use and abuse it’s likely to see over its lifetime. Therefore, you must consider strength as well as beauty.  Choosing a dense hardwood, although more expensive, will produce a table that will withstand a lot of abuse and end up being a better choice overall.


Now you must choose the color and grain of the species.  This is largely going to come down to personal taste and aesthetics but there are a few other things to keep in mind.  Certain woods, such as Oak and Ash, will give your new table a very different finished look than a species such as Cherry or Walnut.  The workability of your new material is just as important.  At this point, you have a design, and you know what joinery you will need to cut.  That beautiful grain you love so much may become your worst enemy later as you tackle a specific joint or process in the project.  If you’re a seasoned woodworker, you may revel in the challenge but for a novice, it can quickly become discouraging and quite possibly become a huge roadblock to the success of your project. 


  Things are moving along nicely, you have your design, and you’ve chosen your wood species.  You’ve given thought to the joinery, grain, color, and wood movement, and how all these factors will affect your new table.  Now, where do you get this stuff?  Where you are located is going to be the biggest factor in what is available to you.  It will also be the biggest factor in what sets the cost.  Areas with a lot of access to raw materials will, for obvious reasons, have a large supply of materials at a lower price.  The opposite is true for areas where wood is scarcer.  Search the internet for “hardwood supplier” in your area.  You will soon find the suppliers that have the goods you’re after.  Go down and look at what each supplier has to offer. Familiarize yourself with their stock and how they are to deal with.  Some will let you pick through the pile and get those special boards your after.  Others will not.   I’d suggest if they won’t let you choose your material then leave.   Head to another supplier and invest the time needed to get the best material you can afford.  The amount of time you’ll spend crafting your new table will be substantial.  Spending that time struggling with expensive, subpar material will, for sure, be an unpleasant experience. 


While you are at your lumber supplier take the time to look around at the other offerings they have. Check out not only the hardwoods but the softwoods and sheet goods they have on hand.  Many suppliers have an overwhelming array of choices and will leave your head spinning with all the possibilities for your current and upcoming projects.    The turnover for lumber can be high at times and that beautiful wood you see there today may very well be gone tomorrow so remember when you find that wood you just have to have “Buy as much as you can reasonably afford, then just a little more”.


One last point I’d like to touch on is finishing.  As woodworkers, we must learn to choose and apply appropriate finishes to our projects.  This can be a rewarding experience or a disaster.  Like wood movement, the more you learn about this aspect of the craft the better you’ll be at choosing appropriate woods for your projects.  “Understanding Wood Finishing” by Bob Flexner, another college textbook, has been a valuable resource over the years.  “Finishing” by Jeff Jewitt is another great resource.   Of course, the endless information online and communities you can participate in will go a long way in educating yourself about this aspect of the craft. 


As you can see there are a lot of factors to consider when choosing your materials.   Above is simply a starting point to get you rolling and keep you on track, but the learning will be endless and lifelong.   That’s the beauty of learning and mastering any craft.  It’s the journey and all the wonderful things you’ll be able to imagine, then craft, with your own two hands.    The people you’ll meet along the way and ultimately the joy you’ll feel when you stand back and look at that newly crafted masterpiece. 


Have fun, be careful, and remember “Make it Or Die Trying.

DINING IN STYLE

DINING IN STYLE

A table at which we gather, discuss our daily lives with loved ones, share meals, and relax.  This table is the “Dining Table”.  Everyone needs some sort of table to eat at and nothing varies more than this one.  Every culture has variations but what remains constant is the utility of the table.  It has a purpose and is more than mere decoration.


Many will find that the dining table will be at the top of the list of first projects.  It’s often the project that gets one into woodworking.  You need a new table, and you think to yourself “I can build that”.  And you’re right.  The ease at which one can put together a basic table makes it accessible to almost anyone.  It’s a project that can be completed in a fairly short time frame and when done it can be put to use immediately and enjoyed by everyone that dines at it.


Of all the dining tables I’ve crafted over the years one of my favorites is the trestle table.  It stands out as a beautiful and functional design. The complete lack of any skirts under the top will give you and your guests a huge amount of legroom, which I especially appreciate being a tall guy.  It works equally well with chairs of varying sizes and shapes as it does with benches.   Over time I’ve refined the design and have ended up with the clean, simple, and robust piece you see pictured at the top of this article.  If you’re interested in building one I’ve got plans available here.  Check it out and let me know what you think.


Regardless of what style you choose the dining table is a fun project that will give you great satisfaction as you gather around it with family and friends.  If you’re considering building one but you’re not quite sure where to start then you’re not alone.   Below I’d like to offer a few thoughts I have on this type of project.  I hope that it may nudge you in the right direction, so you find yourself in the shop crafting that new masterpiece, soon than later. 


The two things that will have the greatest influence on your new table will be the budget and the tools available.  Fortunately, you have options in both areas.  Realistically you could make a table from framing lumber using a circular saw, router, and sander.   If you can push the budget a bit then I’d upgrade the materials before I’d upgrade the tools.  If you can afford even more then a few new fancy tools wouldn’t hurt.  If you can afford even more, well you see where this is going.  It’s a slippery slope.


Pick a design that’s simple for your first table.  Some designs can appear simple until you dig into them.  Avoid the temptation to “Go Big” for the first table.  Taking on something that is just too much may quickly take the wind out of your sails.  The goal is to have fun and spend more time using the table with family and friends than ignoring them while you spend every weekend for months toiling away in your shop.  


Pick a wood that isn’t too hard to work.  Notice I didn’t say easy.  There’s going to be a lot of effort put into this table and a species that machines well, sands fairly easily, and readily takes the finish you choose will make your life a lot easier.  A little forethought on this aspect of the project will pay dividends in the long run.  Search around your local area and see if you can find someone, with some wood laying around, they’re willing to part with for a good deal.  I’ve been through more than a few barns pulling dusty boards out of the rafters where they’ve been sitting for years.  This approach to material acquisition is extra rewarding when you find that stash you just otherwise couldn’t afford.


Choose a simple finish that will protect your table as much as possible.  Finishing wood can be a difficult process at times and nothing is more heartbreaking than spending a huge amount of time on a project, getting to the very end, then ruining the piece on the last step.  Trust me it’s not something you want to experience.  There are endless options when it comes to wood finishes so do a little research and get a good understanding of what level of protection you’re going to want on your new table.   Take into consideration the environment in which you’ll be applying the finish.  Some are very temperamental to temperature and humidity so choose a finish that will work well for your specific situation.


Taking the above into consideration before starting your new table will undoubtedly set you up for success.  Your first table will likely not be your last, so make it a fun experience and enjoy sharing your new creation with others.  Before too long you may find yourself sitting at that table with pencil and paper sketching out your next masterpiece.


Have fun, be careful, and remember “Make it Or Die Trying.


HOW DO YOU MEASURE UP?

HOW DO YOU MEASURE UP?

Is working to .001” in a wood shop feasible and if so, is it practical? 


The answer to the first part of this question is, yes absolutely.  The second part of the question, about it being practical is a little harder to answer.  It’s a kind of yes and no answer.  This is to say it depends on what it is you’re making.   If you’ve ever made a piece of furniture with traditional joinery, chances are you’re already working to this degree of accuracy whether you knew it or not.


You know that feeling when you push a tenon into the mortise you carefully cut, and it fits together with just a slight bit of resistance?  Theres about 4 to 5 thousands of an inch between that joint fitting perfectly and one that’s getting a little loose.  It’s hard to believe but if you pull out a set of calipers and carefully measure, you may be surprised at how a small amount can make a big difference. 


Now I will say that it’s not necessary to measure everything to this degree and it can take away from the joy of just making things.  Use a tape measure and a good ruler and sneak up on those last few thou by feel.  Tune that hand plane and sharpen those chisels and after a while, you’ll just know how much you’re taking off by the look of the shavings.


Over time though, you may find having a good pair of calipers and a conversion chart is a necessity.  If your work involves the use of anything connected to a computer, then it won’t have a clue what a 1/8” is.  It’s going to be decimals all the way.  Whether it’s Imperial or Metric the decimal will rule supreme, and you’ll have to adapt and convert.   That’s where the “Conversion Chart comes in.  Convert that fraction of an inch into a decimal.  Take that millimeter and find the closest fraction.  There are many times you’ll find yourself looking through your drill bits hoping you can find one that is close to that metric bit you just don’t have.  A glance at the conversion chart will have you as close to a fractional bit as possible in no time.


I’m a modern woodworker and in my shop where there’s a machine that speaks in decimals, you’ll find a conversion chart close by.  I machine mine in multiple sizes out of highly visible and easy-to-read plastic.  This keeps them from deteriorating and makes them easy to wipe down from time to time.  A quick search on the internet will bring up a large selection of charts to choose from, including the one you see above.  Pick your favorite, print it off, and your all set.


If you have the means to machine one with a CNC router or laser, then head over to the Branch Butchers free plans section and grab the digital files.  Machine a few up in your favorite material and put them all over the shop or even make a few for your buddies. 


Have fun, be careful, and remember “Make it Or Die Trying.”


THE MODERN WORK BENCH

THE MODERN WORK BENCH

The Modern Work Bench


If you spend a little time on the internet and especially social media, you’ll quickly be convinced that building a traditional woodworking bench is a must.  You see them everywhere, built of the finest materials available and adorned with shiny vices spinning away effortlessly.  But do you really need one?  In this article, we’ll look at what those benches are all about and if maybe an alternative type of bench would be a better fit for the type of work that you do.


Many years ago, when I started my career as a furniture maker, I got a job at a shop run by a classically trained Danish cabinet maker and his son.  I had built a toolbox as my final project in college, so I brought that to the shop and rolled it up to the bench assigned to me.  It was a simple bench made of construction lumber with a sheet of MDF for a work surface.  I made it work and ended up devising lots of clever ways to hold my material in place as I worked away.  Many consisted of screwing jigs and boards right to the top, but it worked, and I was able to produce many pieces with that simple bench. 


As I toiled away at that bench, I couldn’t help but admire the hardwood joiners bench my boss spent his days.  It was a design that was popular in Denmark and unlike anything I’d seen before.  It had a strange front vice that jutted out from one end of the bench and a tail vice at the other.  It was a very purpose-built bench, meant for building furniture with hand tools.   Overall, it was a small and compact bench and after admiring that bench for a while, I couldn’t help but think, it didn’t always suit the type of work we were doing.


I then came across the opportunity to get my hands on a few local Maple trees that were being removed from a relative’s property.  I dreamed of the fantastic bench I could make and had the trees milled up and kiln dried.  I purchased a set of plans with little knowledge of what I actually needed and set off on my bench-making adventure.   I choose a traditional front vice mounted on the left-hand side and a tail vice on the right.   I increased its size and made it so I could disassemble it.  The bench was very heavy, and this would help make it somewhat manageable when it came time to move it.


I still have that bench over 25 years later.  Its vices, being of mediocre quality, have seen better days but it’s still working and gets used almost daily when I’m working on new pieces of furniture.   Over the years I’ve enjoyed working at that bench, but lately, I’ve started to look at it and think, much like I did those many years before, it doesn’t always fit the type of work I’m doing.   Would a modern workbench be better suited?  I will always keep a traditional bench in my shop because they’re perfect for certain operations and, to be honest, they just look so good but I’m sure a modern bench would be a welcome addition.


So, what kind of bench would be best for you? If you’re making furniture solely with hand planes and hand saws, then without question a traditional bench is a good option.  If you find a lot of the tools you use have a cord dangling from them then perhaps a modern bench would be a better choice.   Tools such as the biscuit joiner, Festool domino, plunge router, orbital sander, etc. are all commonplace in today’s wood shops.  Tools have changed a lot over time to adapt to the modern ways in which we work, and the workbench is no exception.  The modern bench with its array of holes drilled through the top seems gimmicky in comparison to the traditional bench but after you spend a little time working with them it becomes hard to deny how efficient they are.


More and more craftsmen are discovering the advantages of these new designs and manufacturers are eager to supply them with all kinds of hold downs, clamps, and various jigs that take advantage of the handy array of holes.   This leaves no shortage of options for work holding and in many cases, a traditional vise may not be necessary.  Depending on the type of work you do a modern bench might be just what you’ve been looking for.


Now no bench is perfect, and all kinds of arguments can be made as to why one design is better than another.   Whole books are written on the subject.  “The Workbench Book” by Scott Landis is a great read and is on my bookshelf along with a couple of others.   The type of bench you choose will ultimately come down to the type of work you do most.  Traditional, Modern, or both are all options in today’s workshops. 


If you’re interested in taking the plunge then check out Branch Butchers “Modern Workbench” plans.

 Over the years I’ve had an array of different benches, some good and some, not so much.  With this bench, I’ve worked hard to create something that takes advantage of all the modern work-holding options available while staying simple to build and most importantly, affordable.  


Have fun, be careful, and remember “Make it Or Die Trying.

PUSH STICKS. USE IT OR LOSE IT!

PUSH STICKS. USE IT OR LOSE IT!

Whether it’s a scrap of wood laying around or something shaped like a Star Wars blaster, a push stick is, in its simplest form, something to keep your hands away from the cutters we all use in our shop. We’ve all been taught to use them, but do we? There are a lot of factors that set a good push stick apart from a bad, or even dangerous, push stick. In this article, we’ll look at some points to consider the next time you buy, or even better, make your next push stick.

The most obvious reason to use one is safety. Keep those precious fingers away from the spinning blades and you’ll keep them attached to your hand longer than if you don’t. So, it’s simple, just use anything that achieves this goal, right? Well kind of.  If you take a quick look around the internet at the offerings available, you’ll quickly realize that there’s a push stick for every occasion. Some are simple and homemade, and others are, expensive, complex contraptions akin to a Swiss army knife.

Many years ago, when I set up my first shop, I needed some push sticks for various machines. Having no money and lots of time, I went about prototyping various designs on some scrap plywood. I cut them out and used them for a while. Some were ok, and others were outright dangerous. After a few iterations and a couple of decades of use, I now have what I feel to be a safe and effective push stick for the type of work that I do.

Now if you have a very specific task, you may find that designing a push stick for that process is the only way to go, but it’s unlikely it’ll be a good all-around push stick.  “The Branch Butches Push Stick” is just that. It excels in most situations and it’s comfortable to use. It keeps your hands away from the cutters and it works just as well on the table saw as it does on the jointer or router table.

Comfort is going to go a long way in how successful a push stick will end up being in your shop.  Something awkward, and complex will see little use. The opposite is true. If it’s comfortable and easy to use, you’ll find yourself reaching for it to make almost all cuts. Over time it may even end up feeling awkward, and unsafe, to not use it. That’s when you know you’ve got the right one. Safely using woodworking machinery is something that you must train yourself to do without really thinking about it. Developing habits that keep you from unnecessary accidents is a must.

If you don’t already have a favorite push stick head over to the free plans section of the site and download the Branch Butchers Push Stick plan. I’ve included two designs in the download that will cover almost all your woodworking needs. I encourage you to grab a few pieces of scrap plywood and make a few to try out. Make sure you use plywood and not solid wood though.  The design is not appropriate for use with solid wood as a failure in use would be catastrophic.

Let’s look at its use on the table saw first. I consider this to be one of the most, if not the most, dangerous pieces of machinery in the wood shop. Ever heard of a Saw Stop table saw? There’s a reason it’s the only tool made that will let you touch a fully spinning cutter and not end up losing a digit. A push stick is a must-have for this machine and using it without one is asking for trouble. One of the problems with table saws that even the Saw Stop won’t help you with is kickbacks.  Yes, you can, and should, use a riving knife and that’s going to help but it’s not always possible.

The material will tend to be pushed up away from the table as it exits the back side of the blade. This will be exasperated even more if your fence is improperly aligned, or the wood pinches the spinning blade. This happens as you relieve tension and is more common in solid lumber than sheet goods.  A good push stick will allow you to not only push the material through the saw but hold the material down to the machine’s work surface. Having a handle that is horizontal, or near horizontal, will allow you to do both. Some may find a slight angle on the handle a little more comfortable on their wrist if used for extended periods, so I’ve included one in the download. I tend to gravitate toward the horizontal one myself but try them both and use whatever one feels best.

A jointer is another tool that will benefit from a push stick. Feeding stock through a jointer safely takes a different approach. The cutters are under the wood and therefore out of sight, for the most part. This can give you the impression it’s not that dangerous. You’d be wrong to think so, and it’s what leads to unnecessary accidents. Much like the table saw, and all other woodworking tools, we have a spinning cutter. As the wood contacts the cutter it’s pushed down toward the table surface but as it exits it’s pushed up away from the machine’s work surface. With the jointer, this will show itself as ripples in the freshly machined wood unless held down. A proper push stick that can apply downward pressure will help and as the stock exits the cutter it will keep your fingers away from the cutter that has been hiding under your material just waiting for a chance to catch you off guard.

I could go on and on about the uses of push sticks on every machine, but I think you get it. They’re a safety device that you must use and not just occasionally. So find a design that is comfortable, and allows you to distribute the pressure you need, in the direction you want, safely. Make a bunch of them so you don’t have to search for one when you need it, and most importantly use them whenever you can.

Have fun, be careful, and remember “Make it Or Die Trying.”